
- 21
Sep
5 easy steps to OAMC or Once-a-Month Cooking with Shop’NCook software
Are you coming back home in the evening too exhausted to even think about cooking? If you find that you resort too often to fast food or that you raid your cupboard for junk food instead of cooking a real meal, you may want to give a try to once-a-month cooking.
The idea behind once-a-month cooking is to cook in a day a whole month-worth of meals and freeze them.
If it sounds intimidating, don’t worry: You don’t have to cook for a whole month.
The closer I ever came to once-a-month cooking was actually a "twice-a-month cooking" experiment (to be known henceforth as TAMC), where I cooked a whole bunch of meals in advance every two weeks. I also didn’t cook for every meal at that, because I like to eat every few days simple and light meals that don’t require advance preparation.
But my experiment in OAMC (or rather TAMC) allowed me to give better and more varied food to my family than I usually would have during weekdays and with a fraction of the time and effort.
Although I am not doing OAMC anymore, I still applies in a loose way the once-a-month cooking principles after each big shopping trip to cook a few meals in advance and freeze them to make the supplies last longer and make my life easier those days I am too tired or don’t have the time to cook.
Whether you use OAMC for cooking all your meals in advance, or just for a few meals per month, Shop’NCook software can help you save further time in all the phases of the planning and preparation.
Here are the step-by-step instructions to get started with OAMC using Shop’NCook software:
First step: Preparing the recipes for OAMC
OAMC cooking occurs in two phases: the preparation phase where you chop, mix, cook and freeze for later use and the final cooking phase the day you eat. Splitting your recipes to reflect these two phases will make your OAMC cooking easier.
Let me show you with an example how the recipes should be split. Here is an OAMC recipe:
My Mini Meat Muffins
What You Need:
1 egg
1/2 C milk
3/4 C white bread crumbs, soft
1 1/2 t salt
1/4 t pepper
1 lb ground chuck
Aluminum foilHow to Make It:
Beat egg slightly in a large mixing bowl.
Carefully stir in the milk.
Add the breadcrumbs and mix.
Sprinkle in the salt and pepper.
Add the ground chuck and mix well with hands to completely combine.
Preheat oven to 350 degrees.
Spray each cup of a muffin tin with a non stick cooking spray.
Fill each cup with the meat mixture.
Bake 30 minutes.
Remove pan from the oven and allow to cool 10 minutes.
Remove muffins from pan and cool completely on a wire rack.
Wrap each muffin tightly in aluminum foil.
Freeze for up to 2 months.
To reheat, remove muffins from freezer.
Preheat oven to 450 degrees.
Place wrapped muffins on a cookie sheet.
Bake 30 minutes.
Unwrap and bake another 5 minutes.
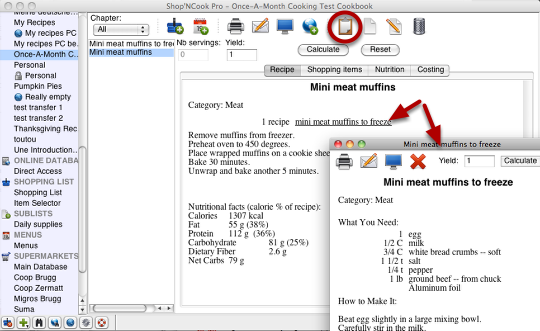
You can split this recipe in the two following recipes:
Mini meat muffins to freeze
What You Need:
1 egg
1/2 C milk
3/4 C white bread crumbs, soft
1 1/2 t salt
1/4 t pepper
1 lb ground chuck
Aluminum foilHow to Make It:
Beat egg slightly in a large mixing bowl.
Carefully stir in the milk.
Add the breadcrumbs and mix.
Sprinkle in the salt and pepper.
Add the ground chuck and mix well with hands to completely combine.
Preheat oven to 350 degrees.
Spray each cup of a muffin tin with a non stick cooking spray.
Fill each cup with the meat mixture.
Bake 30 minutes.
Remove pan from the oven and allow to cool 10 minutes.
Remove muffins from pan and cool completely on a wire rack.
Wrap each muffin tightly in aluminum foil.
Freeze for up to 2 months.
----------------------------Mini meat muffins
1 recipe mini meat muffins to freeze
Remove muffins from freezer.
Preheat oven to 450 degrees.
Place wrapped muffins on a cookie sheet.
Bake 30 minutes.
Unwrap and bake another 5 minutes.
The first recipe is the recipe of the preparation phase. The second recipe is for the finalizing phase just before you eat.
Note that the second recipe refers to the first (preparation day) recipe.
If you copy the two above recipes to the clipboard just like they are and add them to Shop’NCook with the clip button, you will get two separate recipes, with the second recipe "Mini meat muffins" linking to the first one "Mini meat muffins to freeze". Make sure not to forget the line of hyphens between the recipes as it tells the software that a new recipe starts.
OAMC works best where some preparations are common to several recipes. For example, if you prepare spaghettis with meat balls and hamburgers, you can then save time by mixing the condiments with the meat for both recipes at the same time.
Try to find several recipes that use the same base preparations and prepare them for OAMC as shown above.
Also, I like to organize my OAMC recipes in a cookbook with the preparation recipes and final recipes in different chapters. This makes browsing the recipes easier.
Second step: Planning your meals
Now that your recipes are ready for OAMC, you can start planning your meals.
Before doing the actual planning, you need a clear idea of what you want OAMC to achieve for you. Do you need every meals cooked in advance, or only some? Do you want to cook once a month, twice a month, or once a week?
You should also allocate some days for the leftovers and for the unexpected. There is however no risk of having the food go to waste if there is a change in plan, since OAMC meals keep typically up to 3 months in the freezer.
Once you know how many meals you need to prepare, you can go ahead with the planning.
You can assign the recipes to a given day of the week by dragging and dropping them to the calendar.
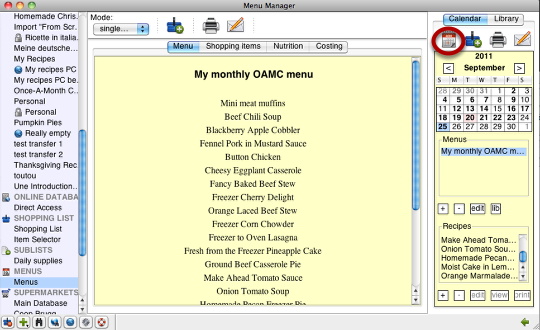
If you prefer a loose planning, you can alternatively add them all to a single menu a chosen day of the month, or of the period for which you are planning.
An advantage of putting all your recipes in one menu is that it makes it easier to reuse your planning for another month, as you can just copy and paste the whole menu.
Note that you only need to add the final recipes to your meal plan. Since they link to the recipes for the preparation day, the ingredients you need for the preparation will be included as well in your meal plan.
To view the whole meal plan, display the Menu tab in the Menu manager, click on the first day of the meal plan on the calendar and select the number of days in the Mode pull down menu in the toolbar. If they are correctly selected, the days of the meal plan must be displayed in green in the calendar.
If you have chosen to add all the recipes to a single menu, you should select the menu in the calendar and choose the mode "Single menu" to view the meal plan.
Third step: Making the shopping list

When planning OAMC by hand, this is without doubt the most tedious step.
Here, Shop’NCook displays all its power as this step takes just a minute and a few clicks:
- Display the Shopping Item tab of the menu manager.
- Select the first day of the planning period.
- Choose the number of days of the meal planning period in the Mode pull down menu of the toolbar. The days of the meal plan should be now displayed in green. If you have added the whole meal plan to a single menu, select the menu and choose the "Single menu" mode instead.
- If necessary, clear the shopping list by clicking on the clear button of the mini toolbar.
- Double-check the ingredient list, then click on the Add button of the toolbar to add the ingredients to the shopping list.
- If you have prepared a sublist with your pantry ingredients as recommended in an earlier post, have a glance at it and make sure you have enough of them for the whole meal plan. Replenish the pantry as needed by adding from the sublist.
- When you are done, display the shopping list and print it to take to the shop or send it to your iPhone.
The fourth step: Preparation day

To start the cooking, select the period of the meal plan as explained above and click on the Print button of the Menu manager to print all the recipes you need. Alternatively, you can send your recipes to your iPad by sending them by e-mail.
Make sure to select to print the recipes and the linked recipes, when prompted. This way, you will have a print-out of the preparation recipes as well as of the finalization recipes.
Once you have all your recipes readily accessible in the kitchen, prepare the meals according to the instructions of the preparation recipes. Then attach the finalization recipe directly on the prepared food pack and freeze it.
The finalization

Choose the pack in the freezer for the meal you want to make and follow the instructions of the attached sheet.
Bon appétit!
I wish you a lot of fun cooking for OAMC with Shop’NCook software. If you have experience or tips to share, please write them in the comments.